

Week 6
- Nov 24, 2014
- 4 min read
Happy Thanksgiving week everyone! I know I have a lot to be thankful for, especially since I get to pursue my dream to build guitars! I am so excited every time I think about it, and every time I go to class to learn new skills! If you have no idea what I’m talking about, then let me give you a little heads up. I’m taking a one-on-one course with Brian Hawkins of Hawkins Guitars (click on his name to go to his website), he is teaching me the art of “Luthiere”, specifically guitar building. This blog is dedicated to my experience through the process of building my first guitar! If you haven’t read my last post, click HERE. Also, please make sure to “like” my teacher Brians Facebook page, by clicking HERE and pressing “like”.
*Sanding the braces

Well, I ended last week by learning to sand the braces, so that’s where we'll start. The key to sanding down your brace is to start with the roughest sand paper and make your way down, so we started with .320 grit, and then .220, and finally the .120. I sanded them down to my desired feel and look, and I then began to work on “capping” the braces. You “cap” an X-brace in the middle where the pieces were joined to strengthen the brace. We used some scrap koa for this, cut it on the band saw
and then Brian showed me how it should look by shaping it using the belt sander and some of the other more simple sanding equipment. He then glued down the koa on one of the braces, and held it in position with his finger. We didn’t use the “go bar system” to clamp down the piece, since it’s too small, and really not needed for this part. After this, he left me alone to do what he had shown me. Everything went smoothly until I came to the part where I had to actually glue and place the cap on. The X braces, unfortunately, weren’t even in the middle of the “X”, so I had to scrape and sand down the middle so the cap would be flush with the braces, leaving no crack. I did this simply enough and after re-glued the cap and then placed it into position, pressing down with my finger to clamp.

After the caps were glued, we put the back away for the day, and pulled out my top. We had already made and glued in our Rosette in week 3 (Click HERE to go to week 3), and now it was time to sand it down, so that it looked like one piece with the top. We first used the thickness sander for this, and got it pretty
close. We then used a scraper to make it look even more flush with the rest of the top.
*Thickness sanding the rossete
*Using the scraper on the rosette

Brian said he hadn’t seen a rosette that flush in a while
All the grain looked great, all the lines looked like they were running together!
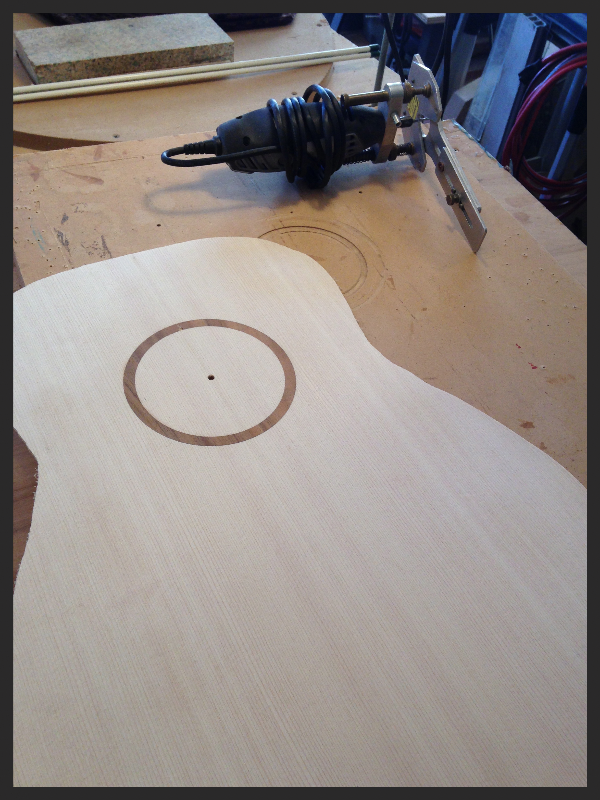
It was now time to cut out our sound hole, and like cutting the rosette we used the dremel tool. We first measured it out, our object being to get through the entirety of the soundboard this time. I cut it a few times, adjusting the tool (with Brians help) and cleaned out the sawdust so I could see what was going on.

*Using the dremel to cut out the soundole
*using the cone sander 2x


After this, Brian brought out a funny looking funnel with some sandpaper attached to it. This piece of “high tech equipment” does the job of sanding the inside of the sound hole, so it’s smooth while still leaving a nice peak at it’s center. He showed me how to hold it and apply even pressure by using one hand to hold one side (parallel to where I was sanding), and the other to move the funnel. The hard part here is that you need to evenly sand the sound hole at every part, so if you sand one way in one spot, you have to do the same thing in the other.
After using the cone, we used some loose sandpaper to finish the job. This took up the rest of my time, and when I finished sanding, I was done for the day.

*Finished Rosette & Soundhole
I know I say it every time, but I absolutely love this work! There’s so much about it that I’m learning and so much that I have yet to learn. I can’t wait to get to the place of “creating” more in the future, but I’m so thankful for the now! I hope you get “stuffed” with all the tastiness of Thanksgiving this week, and you’ll remember that in everything, even in the small and tedious, there is something to be thankful for!
If you want to find out more about Brian and his class click HERE. Also, please “like” his Facebook page by clicking HERE, and hitting the “like” button.
If you enjoyed this post and would like future updates, please enter your email in the subscription box below.
Until next time,
~Daniel
Comments